Friends, I need recipes. Not just of pie and cake and cookies (although that's what I really want to make right now). No, what I really need are recipes for stews, casseroles, and all things delicious and nutritious that will freeze well.
I have done little to no cooking in the last few months, but as I'm gearing up for baby (38 weeks today!) I know I really need to get down to business. I would like to make at least 3 different dishes that will produce leftovers and will stand to be in my freezer for at least a week or two.
Also, if you have tips on how to freeze these dishes, that would be very helpful. I've actually never made enough of anything that warranted it to be frozen before it could be finished.
Thank you in advance! My husband thanks you for keeping our takeout bill low, and I thank you for allowing me to nest in a way that does not involve cleaning supplies. :-)
Showing posts with label food. Show all posts
Showing posts with label food. Show all posts
Tuesday, December 13, 2011


Wednesday, March 30, 2011
Beef and Vegetable Pot Pie
I knew I would make this recipe from the first moment I saw it. I found it in my now second-favorite cookbook: The Essential Dinner Tonight Cookbook by Cooking Light. This is perfect for a cold day when you want something hearty, bready, and healthy.
Ingredients:
1 tablespoon olive oil, divided
1 pound ground sirloin
2 cups chopped zucchini
1 cup chopped onion
1 cup chopped carrot
1 teaspoon dried basil
1/2 teaspoon dried thyme
1 (8 oz) package pre-sliced mushrooms
3 garlic cloves, minced
1/2 cup dry red wine
1/4 cup tomato paste
1 1/2 teaspoons worcestershire sauce
1/2 teaspoon black pepper
1 (14 oz) can fat-free, less-sodium beef broth
2 tablespoons cornstarch
2 tablespoons water
cooking spray
1 (11 oz) can refrigerated soft breadstick dough


Ingredients:
1 tablespoon olive oil, divided
1 pound ground sirloin
2 cups chopped zucchini
1 cup chopped onion
1 cup chopped carrot
1 teaspoon dried basil
1/2 teaspoon dried thyme
1 (8 oz) package pre-sliced mushrooms
3 garlic cloves, minced
1/2 cup dry red wine
1/4 cup tomato paste
1 1/2 teaspoons worcestershire sauce
1/2 teaspoon black pepper
1 (14 oz) can fat-free, less-sodium beef broth
2 tablespoons cornstarch
2 tablespoons water
cooking spray
1 (11 oz) can refrigerated soft breadstick dough

More or less, these are the ingredients I used. You'll notice a lack of mushrooms and red wine because the former I hate and the latter I didn't have.
Instructions:
1. Preheat oven to 400°.
2. Brown beef (if you want, use 1 1/2 teaspoons oil). Drain.

(Yum.)
3. Either remove beef or use a second pan. Heat 1 1/2 teaspoons oil in pan and add zucchini and next 6 ingredients. Sauté until tender.

4. Return beef to pan and stir in wine and next 4 ingredients. Bring to a boil and cook 3 minutes.
5. Combine cornstarch and 2 tablespoons water in a small bowl; stir with a whisk.
6. Add cornstarch mixture to pan; cook 1 minute, stirring constantly.
7. Spoon beef mixture into an 11 x 7 inch baking dish coated with cooking spray. Separate breadstick dough into strips. Arrange strips in a lattice fashion over beef mixture.

(Note I totally missed the over-under idea in the middle.)
8. Bake at 400° for 12 minutes or until browned.

Voilá!
Yield: 6 servings
Friday, February 4, 2011
Curried Orange Chicken
Even though I've been in a bit of a reading slump lately (but I'm trying to fix it by hosting a read-along...won't you join me?), I have been getting back into my love of cooking. Tonight I made a new recipe from an old cookbook, Better Homes and Gardens Cooking for Two (copyright 1968!). Recipes from this era were a bit different (women had much more skill in the kitchen, apparently) so I revised it a bit. Even so, this is pretty easy.
Curried Orange Chicken
2-3 chicken breasts
1/2 teaspoon curry powder
1/2 cup orange juice
2 tablespoons honey
1 tablespoon prepared mustard
2 teaspoons cornstarch
1 tablespoon cold water
1/2 orange, peeled, sliced, and quartered
If you like more sauce per chicken, use 2 chicken breasts. Also, if you're a big fan of curry, you can up it to 1 teaspoon.
Sprinkle chicken with curry powder; rub curry into meat. Arrange chicken in small baking dish. Combine orange juice, honey, and mustard in small saucepan; simmer until blended. Pour over chicken; bake at 400° F for 30 minutes.
Remove chicken to serving platter (yeah, I thought that was funny, too) and keep warm. In small saucepan, combine cornstarch and water; stir in pan juices from chicken. Cook and stir until thick and bubbly. Add orange pieces; heat 1 minute. Pour sauce over chicken on platter or serve separately to be spooned over hot cooked rice. Makes 2 servings (unless you used 3 chicken breasts, and then it serves 3, obviously).

I would definitely make this dish again. My husband, who is a texture eater and doesn't eat oranges for that reason alone, ate and liked each of the orange pieces on his plate. Win!
Curried Orange Chicken
2-3 chicken breasts
1/2 teaspoon curry powder
1/2 cup orange juice
2 tablespoons honey
1 tablespoon prepared mustard
2 teaspoons cornstarch
1 tablespoon cold water
1/2 orange, peeled, sliced, and quartered
If you like more sauce per chicken, use 2 chicken breasts. Also, if you're a big fan of curry, you can up it to 1 teaspoon.
Sprinkle chicken with curry powder; rub curry into meat. Arrange chicken in small baking dish. Combine orange juice, honey, and mustard in small saucepan; simmer until blended. Pour over chicken; bake at 400° F for 30 minutes.
Remove chicken to serving platter (yeah, I thought that was funny, too) and keep warm. In small saucepan, combine cornstarch and water; stir in pan juices from chicken. Cook and stir until thick and bubbly. Add orange pieces; heat 1 minute. Pour sauce over chicken on platter or serve separately to be spooned over hot cooked rice. Makes 2 servings (unless you used 3 chicken breasts, and then it serves 3, obviously).

I would definitely make this dish again. My husband, who is a texture eater and doesn't eat oranges for that reason alone, ate and liked each of the orange pieces on his plate. Win!
Saturday, January 8, 2011
Not the Best Brownies
Hope everyone's having a great weekend! It's snowy and beautiful here, albeit a bit cold.
This past week my family moved my grandmother into an assisted living facility. This was something she had been refusing for some time, but she became very ill over the week of Christmas and realized that she should not be on her own. Her acceptance and willingness of this change in her life has made everything much easier on not only her, but our family as a whole.
That being said, it's still a major life change and could easily trigger some negative emotions. For that reason I decided to bake her some brownies and visit her today (and she was in very high spirits). The brownies were actually her idea. Before she moved she handed me a box of brownie mix and a can of pumpkin with a newspaper article attached to it. She said she had seen the recipe in the article and wanted someone to make the brownies so she could taste one. Being the kind of person I am, I'm always up for a new recipe and a reason to bake.
Well, there's good news and bad news. The good news is that this is the easiest recipe ever. You just take a box of brownie mix and a 15 oz can of pumpkin puree. Mix them together, and bake according to the directions on the brownie box.
The bad news is the brownies kinda suck.
Maybe I'm being too harsh. I'm not really a brownie kind of gal to begin with. But all three people who have tasted these brownies so far (my grandmother, my father, and myself) have no interest in eating more of them. As my grandmother so wisely stated, "If you're going to get fat, you want to get fat on something that tastes good." So I guess you can call this one recipe you don't need to try.
Then again, it's quite possible that kids would love these; they're very moist and chewy, and it's something they could make on their own (with help with the oven, of course). And really, you wouldn't be out much to try them. So here's my recommendation: great for kids to make, but don't expect much.
This past week my family moved my grandmother into an assisted living facility. This was something she had been refusing for some time, but she became very ill over the week of Christmas and realized that she should not be on her own. Her acceptance and willingness of this change in her life has made everything much easier on not only her, but our family as a whole.
That being said, it's still a major life change and could easily trigger some negative emotions. For that reason I decided to bake her some brownies and visit her today (and she was in very high spirits). The brownies were actually her idea. Before she moved she handed me a box of brownie mix and a can of pumpkin with a newspaper article attached to it. She said she had seen the recipe in the article and wanted someone to make the brownies so she could taste one. Being the kind of person I am, I'm always up for a new recipe and a reason to bake.
Well, there's good news and bad news. The good news is that this is the easiest recipe ever. You just take a box of brownie mix and a 15 oz can of pumpkin puree. Mix them together, and bake according to the directions on the brownie box.
The bad news is the brownies kinda suck.
Maybe I'm being too harsh. I'm not really a brownie kind of gal to begin with. But all three people who have tasted these brownies so far (my grandmother, my father, and myself) have no interest in eating more of them. As my grandmother so wisely stated, "If you're going to get fat, you want to get fat on something that tastes good." So I guess you can call this one recipe you don't need to try.
Then again, it's quite possible that kids would love these; they're very moist and chewy, and it's something they could make on their own (with help with the oven, of course). And really, you wouldn't be out much to try them. So here's my recommendation: great for kids to make, but don't expect much.
Saturday, November 27, 2010
Chocolate-Peppermint Cookies
Friends! I just discovered an amazing cookie recipe that's sure to be a hit at your Christmas gathering. As for me, I'll be debuting it at a cookie swap next month. I have to make 7 dozen of these, so you know they're good.
Ingredients:
1 C all-purpose flour
1/2 C unsweetened cocoa
1/4 t baking soda
1/2 C packed brown sugar
1/2 C granulated sugar
3 T butter, softened
3 T applesauce
1 t vanilla extract
1/4 t peppermint extract
1 large egg white, lightly beaten
Cooking spray
Instructions:
1. Combine flour, cocoa, and baking soda in a small bowl. Stir with a whisk.
2. Combine brown sugar, granulated sugar, butter, applesauce, vanilla, and peppermint in a medium bowl. Beat with a mixer on high for 2 minutes. Beat in egg white. Add flour mixture. Beat at low speed until well-blended.
3A. If you have the time, shape dough into 6-inch log, wrap in plastic wrap, and freeze for 1 hour or until firm.
3B. If you don't have time, simply drop the dough onto a greased cookie sheet.
4. Preheat oven to 350 degrees.
5A. If you rolled dough into a log and froze it, cut log into 1/4 inch slices and place on greased cookie sheet.
6. Bake at 350 degrees for 10 minutes.
This should yield about 2 dozen cookies, unless you're like me and really glob it on. I got about a dozen and a half. Also, normally I bake my cookies for 8 minutes, but even the smaller ones needed the full 10, possibly because I didn't freeze them first and they were still doughy at 8 minutes.
I got this recipe from my favorite cookbook, Cooking Light Complete Cookbook. A few things I did differently:
I didn't roll and freeze the dough, I just dropped it into little balls. What can I say? I'm impatient. I also didn't have peppermint extract, but I did have some peppermint chunks (like chocolate chips, but peppermint) and put something like a tablespoon in there (I didn't measure). I also didn't have regular applesauce, so I used cinnamon applesauce. I don't think it made a difference, because I can't taste the cinnamon.
All-in-all, considering I varied wildly at times from the original recipe and I had never made these before, I think they turned out fantastically. They're easy, quick, and delicious. And peppermint-flavored things always remind me of Christmas for some reason, so these are perfect for the season. Enjoy!
Ingredients:
1 C all-purpose flour
1/2 C unsweetened cocoa
1/4 t baking soda
1/2 C packed brown sugar
1/2 C granulated sugar
3 T butter, softened
3 T applesauce
1 t vanilla extract
1/4 t peppermint extract
1 large egg white, lightly beaten
Cooking spray
Instructions:
1. Combine flour, cocoa, and baking soda in a small bowl. Stir with a whisk.
2. Combine brown sugar, granulated sugar, butter, applesauce, vanilla, and peppermint in a medium bowl. Beat with a mixer on high for 2 minutes. Beat in egg white. Add flour mixture. Beat at low speed until well-blended.
3A. If you have the time, shape dough into 6-inch log, wrap in plastic wrap, and freeze for 1 hour or until firm.
3B. If you don't have time, simply drop the dough onto a greased cookie sheet.
4. Preheat oven to 350 degrees.
5A. If you rolled dough into a log and froze it, cut log into 1/4 inch slices and place on greased cookie sheet.
6. Bake at 350 degrees for 10 minutes.
This should yield about 2 dozen cookies, unless you're like me and really glob it on. I got about a dozen and a half. Also, normally I bake my cookies for 8 minutes, but even the smaller ones needed the full 10, possibly because I didn't freeze them first and they were still doughy at 8 minutes.
I got this recipe from my favorite cookbook, Cooking Light Complete Cookbook. A few things I did differently:
I didn't roll and freeze the dough, I just dropped it into little balls. What can I say? I'm impatient. I also didn't have peppermint extract, but I did have some peppermint chunks (like chocolate chips, but peppermint) and put something like a tablespoon in there (I didn't measure). I also didn't have regular applesauce, so I used cinnamon applesauce. I don't think it made a difference, because I can't taste the cinnamon.
All-in-all, considering I varied wildly at times from the original recipe and I had never made these before, I think they turned out fantastically. They're easy, quick, and delicious. And peppermint-flavored things always remind me of Christmas for some reason, so these are perfect for the season. Enjoy!
Friday, June 4, 2010
Going Bananas
I've been in the mood for banana bread. Maybe it was the banana nut bread my mother-in-law brought over after we first moved. Maybe it was the dark brown bananas sitting on my counter. I don't know for sure.


What I do know is I love making banana bread, and I love the way it makes my house smell. This is another recipe I found in my Cooking Light Complete Cookbook.
You'll need:
2 cups all-purpose flour
3/4 teaspoon baking soda
1/2 teaspoon salt
1 cup sugar
1/4 cup butter, softened
2 large eggs
1 1/2 cups mashed ripe banana (about 3 bananas)
1/3 cup plain low-fat yogurt
1 teaspoon vanilla extract
Cooking spray
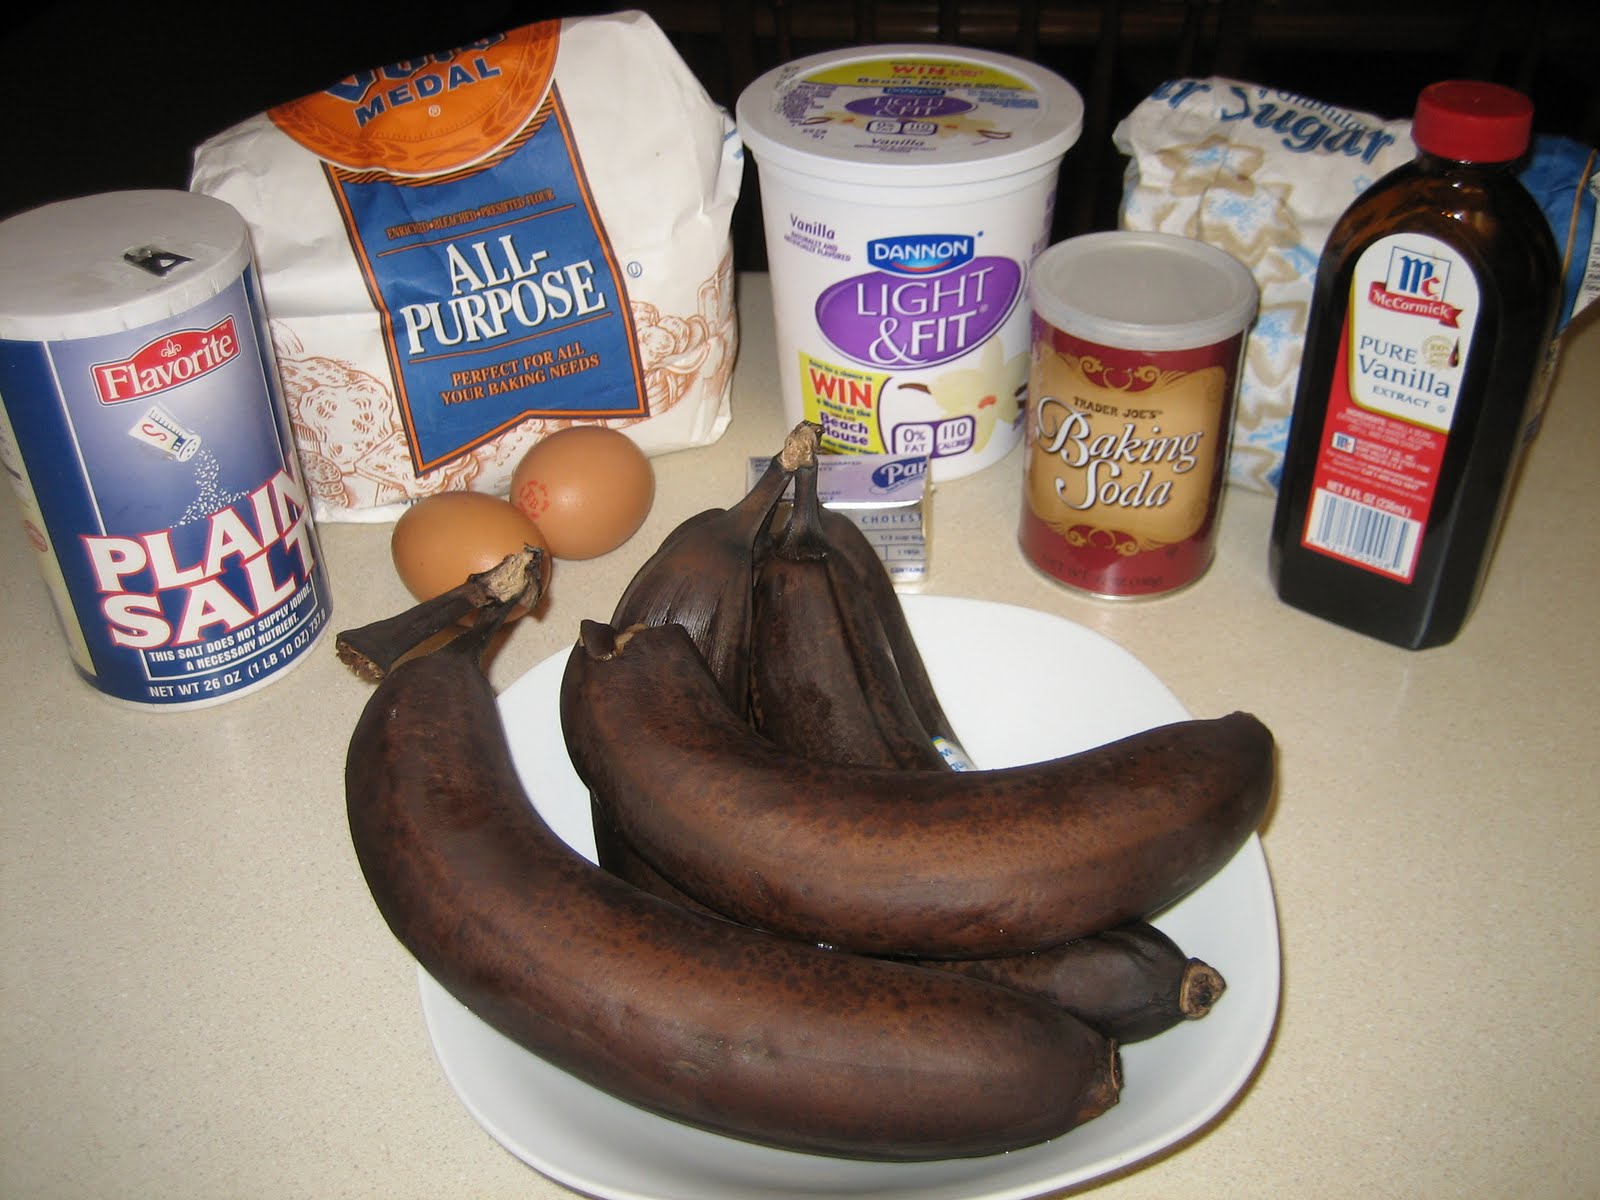
Now, for the record, my three bananas did not add up to 1.5 cups. Also, I couldn't find plain low-fat yogurt, so I bought vanilla-flavored low-fat yogurt, seeing as how I was putting vanilla extract in there anyway, and I'm a big fan of vanilla.
Here's what you do:
1. Preheat your oven to 350 degrees.
2. Combine flour, baking soda, and salt.
3. Place sugar and butter in a large bowl and beat with a mixer until well-blended. Add eggs, 1 at a time, beating well after each addition. Add the bananas, yogurt, and vanilla, beating until blended. Add the flour mixture and beat at a low speed just until moist.
4. Spoon batter into an 8 x 4-inch loaf pan coated with cooking spray. Bake at 350 for 1 hour or until a wooden pick inserted in the center comes out clean. Cool for 10 minutes in pan on a wire rack; remove from pan. Cool completely on wire rack.
According to this recipe, there are 14 servings, each of which is 187 calories and has 4.3g of fat. I have no idea what a "normal" slice of banana bread would have in it, but I can only assume this is better than that.
And finally, I know you're looking at that original picture and thinking, "Um, Amy? There are 6 bananas there. I know math has never been a strong point for you, but I'm pretty sure you can do basic addition."
It's true, I can. So, what do you do when you have double the number of bananas you need, but only 1 bread pan? Make banana muffins, of course! (I only baked these for about 35-40 minutes, so make sure you adjust your baking time.)

Then, if you're feeling especially generous and brave, you could take those muffins over to your new neighbors that just moved in across the street, because you know you felt welcomed into the addition when your neighbor did it for you. If I happen to see them out tomorrow and it doesn't look like I'd be intruding, that's my plan.
P.S. Those of you here from Weekend Cooking with Beth Fish Reads might also want to check out my review of A Homemade Life: Stories and Recipes From My Kitchen Table, by Molly Wizenberg. Absolutely fabulous.
Saturday, May 29, 2010
Birthday Cake
I had never made a layer cake before, and my mom's birthday was coming up. What better opportunity?
Here's a picture of how it all started:

This is most everything I used. I say "most" because inevitably I left something out. I just don't remember what it was anymore. Nothing important, I'm sure....oh! I think it was the powdered sugar. Yeah, you're gonna need that if you want frosting.
Notice the bag of Splenda. I decided to try it out since I'd never baked with it before. I couldn't tell the difference while eating the cake, and I'm not sure if it would have anything to do with the rising factor but, well, what do you think?

Those are 8-inch cake pans and that cake is only about halfway up the sides, when the recipe called for 9-inch cake pans.

I also had issues with waiting until the cake was completely cooled before I iced it, causing it to pool slightly on the bottom of the serving dish. But really, it's not my fault because it was 10:30 at night and cake is supposed to cool faster at night when you're exhausted and want nothing more than to just go to bed. Right? Right?
Ultimately, even though Keith says it looked like a frog (sorry, honey, I'm not letting that one go) and it wasn't the prettiest cake on the block, it tasted delicious. Next time, I'll try a few different things (like being patient) and see if it turns out any prettier, because the flavor certainly doesn't need to be improved.
 I got the recipe for this Old-Fashioned Caramel Layer Cake from the Cooking Light Complete Cookbook. Want to see what others are cooking this weekend? Check out Weekend Cooking with Beth Fish Reads.
Here's a picture of how it all started:

This is most everything I used. I say "most" because inevitably I left something out. I just don't remember what it was anymore. Nothing important, I'm sure....oh! I think it was the powdered sugar. Yeah, you're gonna need that if you want frosting.
Notice the bag of Splenda. I decided to try it out since I'd never baked with it before. I couldn't tell the difference while eating the cake, and I'm not sure if it would have anything to do with the rising factor but, well, what do you think?

Those are 8-inch cake pans and that cake is only about halfway up the sides, when the recipe called for 9-inch cake pans.

I also had issues with waiting until the cake was completely cooled before I iced it, causing it to pool slightly on the bottom of the serving dish. But really, it's not my fault because it was 10:30 at night and cake is supposed to cool faster at night when you're exhausted and want nothing more than to just go to bed. Right? Right?
Ultimately, even though Keith says it looked like a frog (sorry, honey, I'm not letting that one go) and it wasn't the prettiest cake on the block, it tasted delicious. Next time, I'll try a few different things (like being patient) and see if it turns out any prettier, because the flavor certainly doesn't need to be improved.
Friday, April 9, 2010
Happy 2nd Birthday, Lizzie!
Today, my puppy turns two years old. I can't believe it. Where did the time go?


Tonight I baked her homemade dog treats. It's a really simple recipe, and I took pictures throughout the process.
Here's what you'll need:
2 cups flour (I used whole wheat this time but used regular white flour the first time)
1 cup rolled oats
1/3 cup peanut butter
1 1/4 cup hot water

Directions:
1. Preheat oven to 350 F.
2. Mix dry ingredients.

3. Mix the peanut butter and hot water into the dry ingredients and knead well.

4. Spread flour onto a clean surface so the dough doesn't stick when you roll it out.

5. Roll out the dough to 1/4" thick and use your favorite cookie cutters to cut it out.

6. If you'd like to be fancy, you can put an egg wash on them to make them shiny.

7. Bake on a lightly greased cookie sheet for 40 minutes. (Don't mind the disgusting-looking oven.)

8. You can let them cool overnight if you want, but Lizzie couldn't wait that long, so I cooled them on a wire rack, and that took about half an hour.

9. Enjoy!

Lizzie inhaled her treat! I almost couldn't get a picture snapped fast enough before it was gone.

Yield: Around 2 dozen, depending on the size of your cookie cutters.
I found this recipe here. It says you can store these treats in an air-tight container at room temperature for one week, in the refrigerator for 3 weeks, and in the freezer for up to 6 months.
To see Lizzie through the years, click on the Lizzie tag in the side bar on the left. Lots of pictures and videos!


Tonight I baked her homemade dog treats. It's a really simple recipe, and I took pictures throughout the process.
Here's what you'll need:
2 cups flour (I used whole wheat this time but used regular white flour the first time)
1 cup rolled oats
1/3 cup peanut butter
1 1/4 cup hot water

Directions:
1. Preheat oven to 350 F.
2. Mix dry ingredients.

3. Mix the peanut butter and hot water into the dry ingredients and knead well.

4. Spread flour onto a clean surface so the dough doesn't stick when you roll it out.

5. Roll out the dough to 1/4" thick and use your favorite cookie cutters to cut it out.

6. If you'd like to be fancy, you can put an egg wash on them to make them shiny.

7. Bake on a lightly greased cookie sheet for 40 minutes. (Don't mind the disgusting-looking oven.)

8. You can let them cool overnight if you want, but Lizzie couldn't wait that long, so I cooled them on a wire rack, and that took about half an hour.

9. Enjoy!

Lizzie inhaled her treat! I almost couldn't get a picture snapped fast enough before it was gone.

Yield: Around 2 dozen, depending on the size of your cookie cutters.
I found this recipe here. It says you can store these treats in an air-tight container at room temperature for one week, in the refrigerator for 3 weeks, and in the freezer for up to 6 months.
To see Lizzie through the years, click on the Lizzie tag in the side bar on the left. Lots of pictures and videos!
Saturday, April 3, 2010
Seafood Gumbo
A few weeks ago we got a recipe from Keith's mom for seafood gumbo so, the other night, Keith made it while I was still at work (what a great husband, no?). He took pictures to show me the process, and I've decided to share a few of them with you.


Now obviously there are other spices and things in there (like rice), but I don't have the recipe in front of me, so just pretend it's a family secret. :-) What I can tell you, however, is that it's delicious. Thank you, Keith, for a delicious dinner!

This is my first contribution to Weekend Cooking with Beth Fish Reads. Click the link to see what others are posting about food!
Here is celery, okra, tomatoes, onions, green peppers, and bacon boiling in sherry and cooking wine. (Is that not the biggest pot you've ever seen?)

He added shrimp, scallops, and bluegill (any white fish would work, I think).

Mix them all together...

And you get a delicious seafood gumbo!

Now obviously there are other spices and things in there (like rice), but I don't have the recipe in front of me, so just pretend it's a family secret. :-) What I can tell you, however, is that it's delicious. Thank you, Keith, for a delicious dinner!

This is my first contribution to Weekend Cooking with Beth Fish Reads. Click the link to see what others are posting about food!
Tuesday, September 1, 2009
Seafood Fettuccine
Two posts in two days?? It's true. And it's because I have to tell you about this new dish Keith and I made last night: seafood fettuccine alfredo - and it was healthy!
I don't normally like seafood (I can handle about 5 shrimp and then I'm done) but this was delicious. I would have taken a picture, but it really wouldn't have done it justice - you can't see the flavor. It really tasted like something you would order at a restaurant.
I don't know why I'm so surprised - Keith and I make delicious meals all the time. Maybe it's because it's seafood-based (shrimp, scallops, and crab) and I actually like it. Maybe because it's actually pretty healthy (430 calories/serving vs. the normal 720) and I don't feel like I'm missing out on anything. Maybe it's just because it was so simple to make. But I love it, and I'm very proud of us for stepping out of our comfort zone (okay, probably just mine) and discovering a new dish that I'm sure we'll make again and again.
I don't normally like seafood (I can handle about 5 shrimp and then I'm done) but this was delicious. I would have taken a picture, but it really wouldn't have done it justice - you can't see the flavor. It really tasted like something you would order at a restaurant.
I don't know why I'm so surprised - Keith and I make delicious meals all the time. Maybe it's because it's seafood-based (shrimp, scallops, and crab) and I actually like it. Maybe because it's actually pretty healthy (430 calories/serving vs. the normal 720) and I don't feel like I'm missing out on anything. Maybe it's just because it was so simple to make. But I love it, and I'm very proud of us for stepping out of our comfort zone (okay, probably just mine) and discovering a new dish that I'm sure we'll make again and again.
Tuesday, June 16, 2009
Happy Birthday To Me!
So Saturday was my birthday (as if you didn't know - it should be a national holiday) and it was an absolutely wonderful day. I went out the night before with some friends, got up at a reasonable hour without feeling tired at all (which is pretty fantastic in and of itself), took Lizzie to the dog park where I just enjoyed watching her smiley face race around, and then promptly gave her a bath when we got home (she loves the kiddie pools and doesn't mind the mud around them). Then I spent the afternoon making my first ever strawberry shortcake:

It wasn't perfect, but it tasted great. It turns out I need some practice cutting the shortcake in half (when I make the top and bottom layers) so it doesn't fall apart.
Later in the day my parents drove down and took me out to dinner (it was delicious) and then my mom and I went to see Wicked.....I can't even begin to tell you how amazing that show was. I want to go again. Now. I was a bit apprehensive that the main actresses who play Elphaba and Galinda wouldn't come close to Idina Mendez and Kristin Chenoweth, but I've gotta say, they were both fantastic. And I loved how the woman who played Galinda did a lot of the same quirky things Kristin does, so it made it just that much more special for me.
All in all, a great day. :-)

It wasn't perfect, but it tasted great. It turns out I need some practice cutting the shortcake in half (when I make the top and bottom layers) so it doesn't fall apart.
Later in the day my parents drove down and took me out to dinner (it was delicious) and then my mom and I went to see Wicked.....I can't even begin to tell you how amazing that show was. I want to go again. Now. I was a bit apprehensive that the main actresses who play Elphaba and Galinda wouldn't come close to Idina Mendez and Kristin Chenoweth, but I've gotta say, they were both fantastic. And I loved how the woman who played Galinda did a lot of the same quirky things Kristin does, so it made it just that much more special for me.
All in all, a great day. :-)
Wednesday, April 8, 2009
Baking
I love baking. It lifts my spirit and puts me in a good mood. Tonight, I came up with an idea to bake Lizzie some homemade dog biscuits. It gave me something new to bake, and I'm guaranteed not to eat it until my stomach hurts. :-)

Without naming names, someone I know calls my chocolate chip cookies "ugly" because I don't mash them into perfect circles, so tonight I tried something new:

After I made a bunch of these this way, Keith said he had told me a long time ago that I could've done the same thing with a shot glass, so I did and it really was easier (don't tell him that, though).
So, a little more than 40 minutes later, Lizzie had a new, homemade treat to enjoy! I think she likes it! :-)

Without naming names, someone I know calls my chocolate chip cookies "ugly" because I don't mash them into perfect circles, so tonight I tried something new:
After I made a bunch of these this way, Keith said he had told me a long time ago that I could've done the same thing with a shot glass, so I did and it really was easier (don't tell him that, though).
So, a little more than 40 minutes later, Lizzie had a new, homemade treat to enjoy! I think she likes it! :-)
Tuesday, February 10, 2009
Homemade Stir-Fry
I'm no food aficionado, nor am I a master cook/chef, but I was pretty proud of the dish I made last night. For the first time ever, I made my own stir-fry, instead of using one of La Choy's pre-made cans. I thought the skillet filled with zuchinni, yellow squash, pea pods, water chestnuts, and red peppers looked pretty, so I ran out of the kitchen to grab my camera and came back to snap this shot.

To complete my fantastic dinner, I added shrimp, rice, and teriyaki sauce. Yum!
To complete my fantastic dinner, I added shrimp, rice, and teriyaki sauce. Yum!
Thursday, August 7, 2008
Food Review!
I forgot that I hadn't told you about St. Elmo Steakhouse yet! Keith and I both really liked it; we thought the food was cooked beautifully and the atmosphere was pleasant. The waiters are dressed in tuxes, but customers are "dress casual" so we didn't feel uncomfortable in khakis. We had been told, and I would tell anyone else who goes there, that you have to try the shrimp cocktail. It's expensive (as is all the food) but it is definitely different from any other shrimp cocktail I've ever had. They use fresh ground horseradish, and if you breathe in through your nose you will definitely regret it. Our waiter was nice (he was actually a very excellent waiter) and gave us tips and advice for eating it which we definitely put into practice.
If you go to their website you can get full details about their history, menu, as well as make reservations online (they even send you a confirmation email, which I really liked). It was definitely good, and definitely worth the price, although the price does make it more of a special-occasion-only meal. Since it was Keith's birthday, they provided him (and me) with an amazing, delicious complementary chocolate cake-like thing, complete with candle. It was very nice. :-)
Now, if you want to know where I rank it - above Cork 'n' Cleaver but below Catablu. I know I'm comparing an Indy restaurant to Fort Wayne restaurants, but that's about all I have to base it on.
If you go to their website you can get full details about their history, menu, as well as make reservations online (they even send you a confirmation email, which I really liked). It was definitely good, and definitely worth the price, although the price does make it more of a special-occasion-only meal. Since it was Keith's birthday, they provided him (and me) with an amazing, delicious complementary chocolate cake-like thing, complete with candle. It was very nice. :-)
Now, if you want to know where I rank it - above Cork 'n' Cleaver but below Catablu. I know I'm comparing an Indy restaurant to Fort Wayne restaurants, but that's about all I have to base it on.
Thursday, May 1, 2008
Mmmmmmmm

Thanks to my iGoogle page (have I mentioned how much I love iGoogle?) and my wikiHow feature, I found out how to make an oreo cheesecake from scratch. And oh yes, I plan on trying it. As soon as I get the necessary equipment, of course. What's your favorite recipe (cheesecake or otherwise)? I love making new things, so let me know!
*Picture from wikiHow.
Subscribe to:
Posts (Atom)